Solana NFT Explorer
Introduction
Solana NFT Explorer is an app powered by the Solana NFT API which lets you explore all the NFTs that any wallet is holding.
In this app we use get Wallet NFTs endpoint, to fetch all the NFTs of a wallet and we use get NFT Metadata endpoint to get the metadata of the wallet NFTs.
This is what the final application looks like.
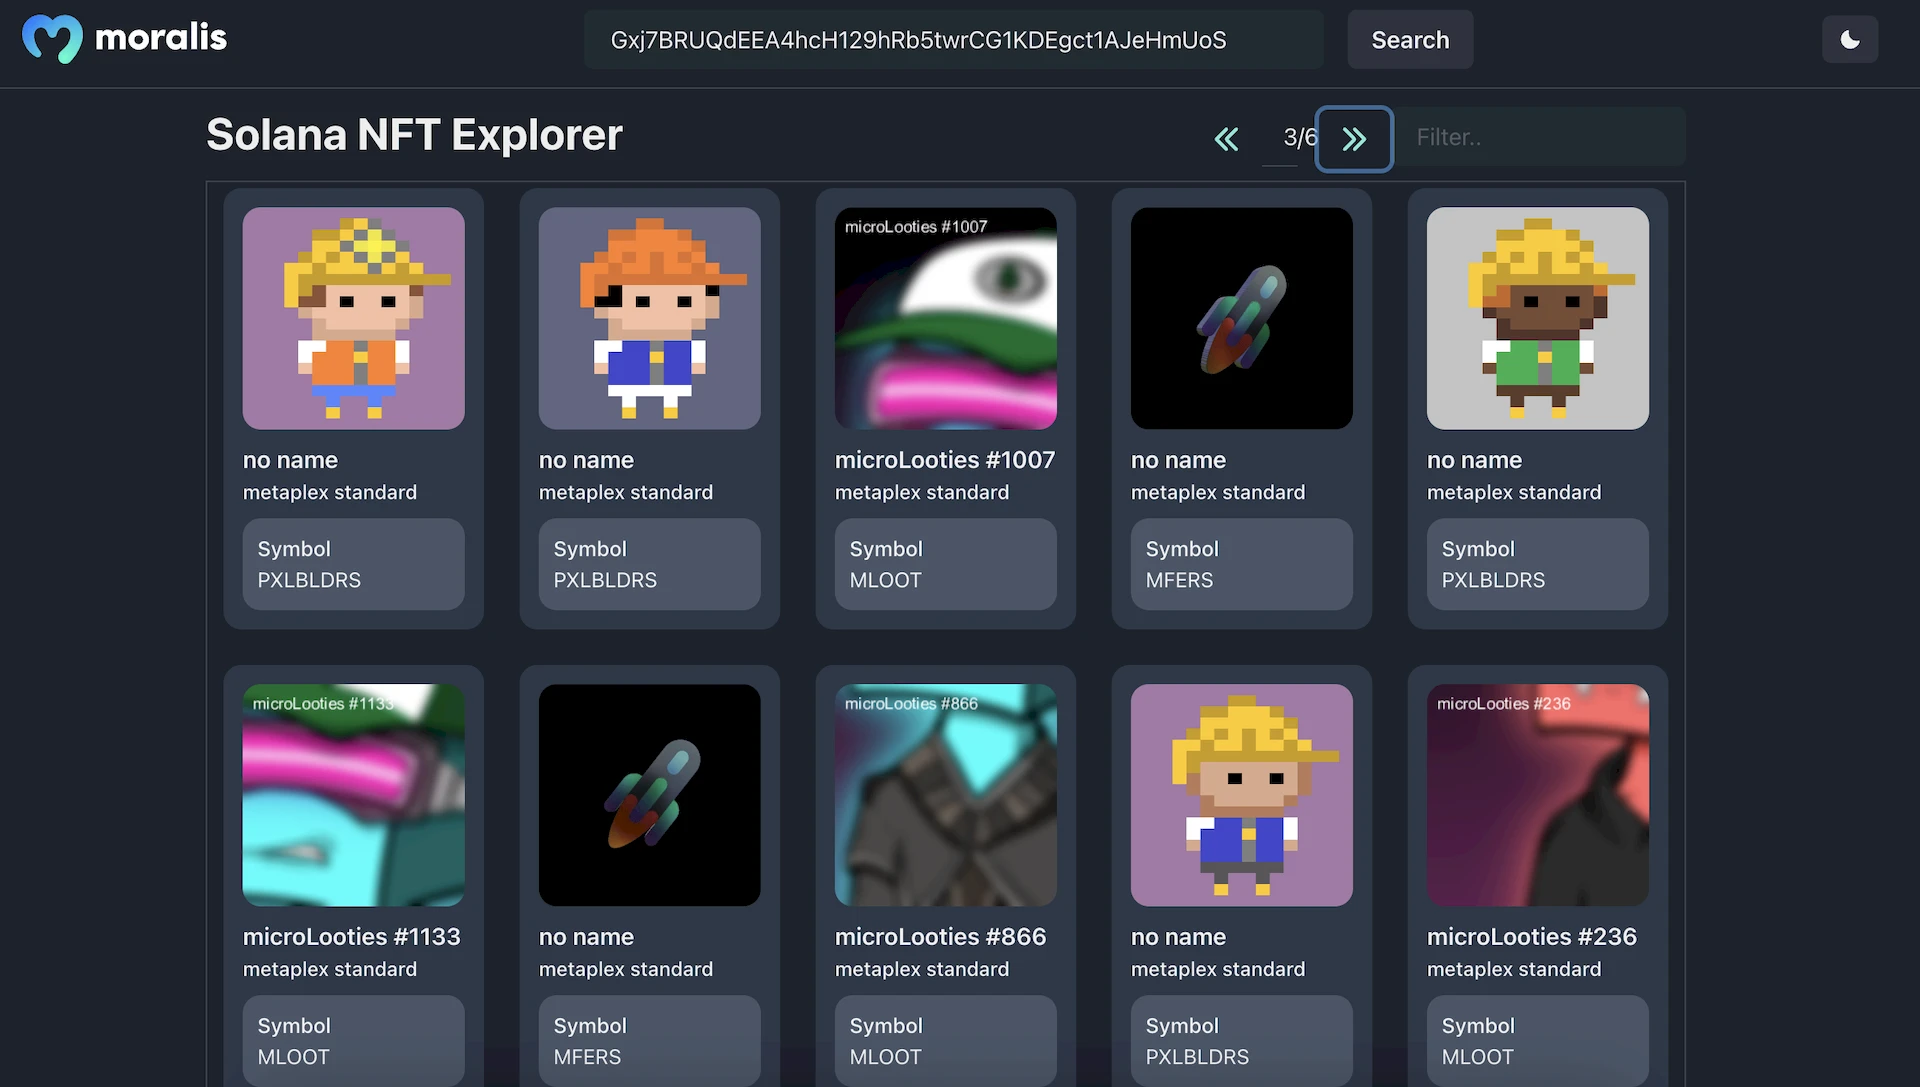
This application has the following features:
- Search bar to search for NFTs in any wallet
- Paginated results
- Option to filter NFTs based on the NFT symbol
This tutorial will walk you through the code on how to create a similar application with the above-mentioned features.
You can find the repository with the final code here: Solana-NFT-Explorer.
Step1: Project Setup
Follow these steps to run the project in your local environment.
- Clone the project from GitHub using the
git clonecommand andcdinto the project
git clone https://github.com/JohnVersus/solana-nft-explorer.git

cd solana-nft-explorer
- Install the dependencies using the
yarnornpmpackage manager.
yarn install
- Rename
.env.local.examplefile to.env.localand add the required environment secrets.
# Required - get from https://admin.moralis.io/web3apis
MORALIS_API_KEY= xxx
- Start the app in localhost port 3000.
yarn run dev
Once the command has been run successfully, you should be able to view the app in localhost port 3000, or click here to open the page directly.
Step2: Fetching the NFTs
The first step when you visit the app is to search for wallet NFTs using the search bar. Clicking on the "Search" button uses the Solana API to fetch the NFTs.

Here is the code responsible for it.
Only partial code is shown here to keep it clean. Visit
pages/index.jsxto view the entire code.
Read the comments in the below code in numbered order.
// Refer full code in `pages/index.jsx`

// State variable to store the search input and the search result.
const [searchInput, setSearchInput] = useState('');
const [searchResult, setSearchResult] = useState([]);

// 2️⃣
// `inputHandler` function handles the address entered in search bar
// and stores in state variable.
const inputHandler = (e) => {
  const Text = e.target.value;
  setSearchInput(Text);
};

// 4️⃣
// `nftSearch` function will be called with a search button click.
// This function uses the state value in `setSearchInput` and
// calls the backend api route to fetch the NFTs using `getNFTs` api endpoint.
const nftSearch = async () => {
  setSearchResult(() => null);
  setQuery('');
  setPage(1);
  if (searchInput) {
    const options = {
      network: 'mainnet',
      address: searchInput,
    };
    const response = await apiPost('/SolApi/account/getNFTs', options);
    // 6️⃣
    // response from backend api route is saved in the state variable
    setSearchResult(() => response);
  }
};

return (
  //...
  // 1️⃣
  // Input component takes user input from search bar
  // and triggers `inputHandler`function on input change
  <Input
  variant="filled"
  placeholder="Enter Wallet Address.."
  width={500}
  onInput={inputHandler} />

  // 3️⃣
  //Button to call the `nftSearch` function
  <Button colorScheme="gray" onClick={nftSearch}>
    Search
  </Button>
   //...
);


// This is the code for backend API route using which
// we fetch the wallet NFTs in `nftSearch` function.

// Refer below code in `pages/api/SolApi/account/getNFTs.js`

// 5️⃣
// This API route uses `getNFTs` function from Moralis sdk to get the NFTs and
// send the response to frontend
import Moralis from 'moralis';

export default async function handler(req, res) {
  const { address, network } = req.body;
  await Moralis.start({ apiKey: process.env.MORALIS_API_KEY });

  try {
    const data = await Moralis.SolApi.account.getNFTs({
      network,
      address,
    });
    res.status(200).json(data);
  } catch (error) {
    res.status(400).json(error);
  }
}
With the above code, we have fetched all the NFTs of a Solana wallet and stored the NFT data in a searchResult state variable.
Now we will use this data to fetch metadata of the NFT and update the UI with it. Here is the code for it.
// Refer full code in `pages/index.jsx`

// The data stored in nftsToDelete state variable is used to
// delete the selected NFTs
const [pageResult, setPageResult] = useState([]);

// 2️⃣
// Load pages function updates the `pageResult` state variable with
// the first 10 items of the `searchResult` data.
// This is because we only want to show 10 NFTs per page.
const loadPage = () => {
  setPageResult(searchResult?.slice((page - 1) * 10, page * 10));
};

// 1️⃣
// When the `searchResult` state is updated with the data from getNFTs endpoint,
// this useEffect will be triggered and it invokes the `loadPage` function.
useEffect(() => {
  loadPage();
}, [searchResult, page]);


return (
  //...
  // 3️⃣
  // Whenever the `pageResult` state is updated this part of the UI is
  // re-rendered with the NFT data from the `pageResult`.
  <VStack w={'full'} h={'650'} scrollBehavior={'auto'} borderWidth={'thin'} boxShadow={'inherit'} padding={'1'}>
    {pageResult?.length > 0 ? (
      <Grid templateColumns="repeat(5, 1fr)" gap={6} overflow="auto">
        {pageResult?.map((e, i) => {
          // 4️⃣
          // `NFTCard` component is responsible for fetching the NFT metadata.
          // Refer next step for more details.
          return <NFTCard key={i} nftAddress={e.mint} filterQuery={query} />;
        })}
      </Grid>
    ) : (
      <Center height={500} color="GrayText">
        <i>No Data</i>
      </Center>
    )}
  </VStack>

  //...
);
Here is the code of the NFTCard component.
// Refer full code in `src/components/modules/NFTCard/NFTCard.jsx`

// 5️⃣
// NFTCard uses two parameters.
// Lets take a look at `nftAddress` address now.
const NFTCard = ({ nftAddress, filterQuery }) => {
  //...
  const [nftData, setNftData] = useState({ contractType: '', name: '', symbol: '', metadata: '' });
  const [filterSymbol, setFilterSymbol] = useState();

  //7️⃣
  // `getNFTMetadata` function sends a request to backend api route
  // to fetch the metadata.
  const getNFTMetadata = async () => {
    const options = {
      network: 'mainnet',
      address: nftAddress,
    };
    const response = await apiPost('/SolApi/nft/getNFTMetadata', options);
    const result = await axios.get(`${response.metaplex.metadataUri}`, {
      headers: {
        'content-type': 'application/json',
      },
    });
    setFilterSymbol(response.symbol);
    // 9️⃣
    // Data from backend API route is saved in `nftData` state variable.
    setNftData({
      contractType: response.standard,
      name: response.name,
      symbol: response.symbol,
      metadata: result.data,
    });
  };

  // 6️⃣
  // When the component is first loaded with `nftAddress` this below
  // useEffect will be triggered and it invokes the `getNFTMetadata` function.
  useEffect(() => {
    if (nftAddress) {
      getNFTMetadata();
    }
  }, [nftAddress]);

  if (filterSymbol?.toLowerCase().includes(filterQuery)) {
    return (
      <>
      // 🔟
      // When the data in `nftData` state variable is updated, the UI
      // will be rendered with the NFT metadata.
        <Box bgColor={bgColor} padding={3} borderRadius="xl" borderWidth="1px" borderColor={borderColor}>
          <Box maxHeight="260px" overflow={'hidden'} borderRadius="xl">
            <Image
              src={resolveIPFS(nftData?.metadata?.image)}
              //...
            />
          </Box>
          <Box mt="1" fontWeight="semibold" as="h4" noOfLines={1} marginTop={2}>
            {nftData?.name ? nftData?.name : <>no name</>}
          </Box>
          <HStack alignItems={'center'}>
            <Box as="h4" noOfLines={1} fontWeight="medium" fontSize="smaller">
              {nftData?.contractType} standard
            </Box>
          </HStack>
          <SimpleGrid columns={1} spacing={4} bgColor={descBgColor} padding={2.5} borderRadius="xl" marginTop={2}>
            <Box>
              <Box as="h4" noOfLines={1} fontWeight="medium" fontSize="sm">
                Symbol
              </Box>
              <Box as="h4" noOfLines={1} fontSize="sm">
                {nftData?.symbol ? nftData?.symbol : <>no symbol</>}
              </Box>
            </Box>
          </SimpleGrid>
        </Box>
      </>
    );
  }
  return null;
};
Code of backend API route to fetch NFT metadata
// Refer full code in `pages/api/SolApi/nft/getNFTMetadata.js`

// 8️⃣
// This API route uses `getNFTMetadata` function from Moralis sdk to get the
// NFT metadata and sends the response to frontend
import Moralis from 'moralis';

export default async function handler(req, res) {
  const { address, network } = req.body;
  await Moralis.start({ apiKey: process.env.MORALIS_API_KEY });

  try {
    const data = await Moralis.SolApi.nft.getNFTMetadata({
      network,
      address,
    });
    res.status(200).json(data);
  } catch (error) {
    res.status(400).json(error);
  }
}
By now we have gone through the code responsible to fetch the NFTs and updating the NFTs in UI.
Step3: Paginated and Filtered Results
Let's look at the code responsible for paginated results.
Navigation between pages is handled using these buttons.

Here is the code for it.
// Refer full code in `pages/index.jsx`

// State variable to store the page result and page number data.
const [pageResult, setPageResult] = useState([]);
const [page, setPage] = useState(1);

const prevPage = () => {
  setPageResult([]);
  if (page !== 1) {
    setPage(page - 1);
  }
};

// 2️⃣
// Next page function updates the page state with next page number.
const nextPage = () => {
  setPageResult([]);
  if (page < Math.ceil(searchResult.length / 10)) {
    setPage(page + 1);
  }
};

// 4️⃣
// loadPage function updates the data in page result state with next 10 NFT data.
const loadPage = () => {
  setPageResult(searchResult?.slice((page - 1) * 10, page * 10));
};

// 3️⃣
// Change in page number triggers the useState and invokes the `loadPage` function
useEffect(() => {
  loadPage();
}, [searchResult, page]);

return (
  //...
  // 6️⃣
  // The same process is repeated when we click on the previous page button.
    <Button colorScheme="teal" variant="ghost" onClick={prevPage} disabled={page === 1}>
      <ArrowLeftIcon />
    </Button>
    <Input
      textAlign={'right'}
      placeholder={page}
      htmlSize={2}
      width="auto"
      onInput={pageInputHandler}
      variant="flushed"
      value={page}
    />
    /{searchResult && Math.ceil(searchResult.length / 10)}
    // 1️⃣
    // Clicking on the next page button calls the `nextPage` function
    <Button
      colorScheme="teal"
      variant="ghost"
      onClick={nextPage}
      disabled={page >= Math.ceil(searchResult.length / 10)}
    >
      <ArrowRightIcon />
    </Button>
  //...

  //...
  // 5️⃣
  // Whenever the `pageResult` state is update this part of the UI is
  // re-rendered with the NFT data from the `pageResult`.
  <VStack w={'full'} h={'650'} scrollBehavior={'auto'} borderWidth={'thin'} boxShadow={'inherit'} padding={'1'}>
    {pageResult?.length > 0 ? (
      <Grid templateColumns="repeat(5, 1fr)" gap={6} overflow="auto">
        {pageResult?.map((e, i) => {
          return <NFTCard key={i} nftAddress={e.mint} filterQuery={query} />;
        })}
      </Grid>
    ) : (
      <Center height={500} color="GrayText">
        <i>No Data</i>
      </Center>
    )}
  </VStack>

  //...
);
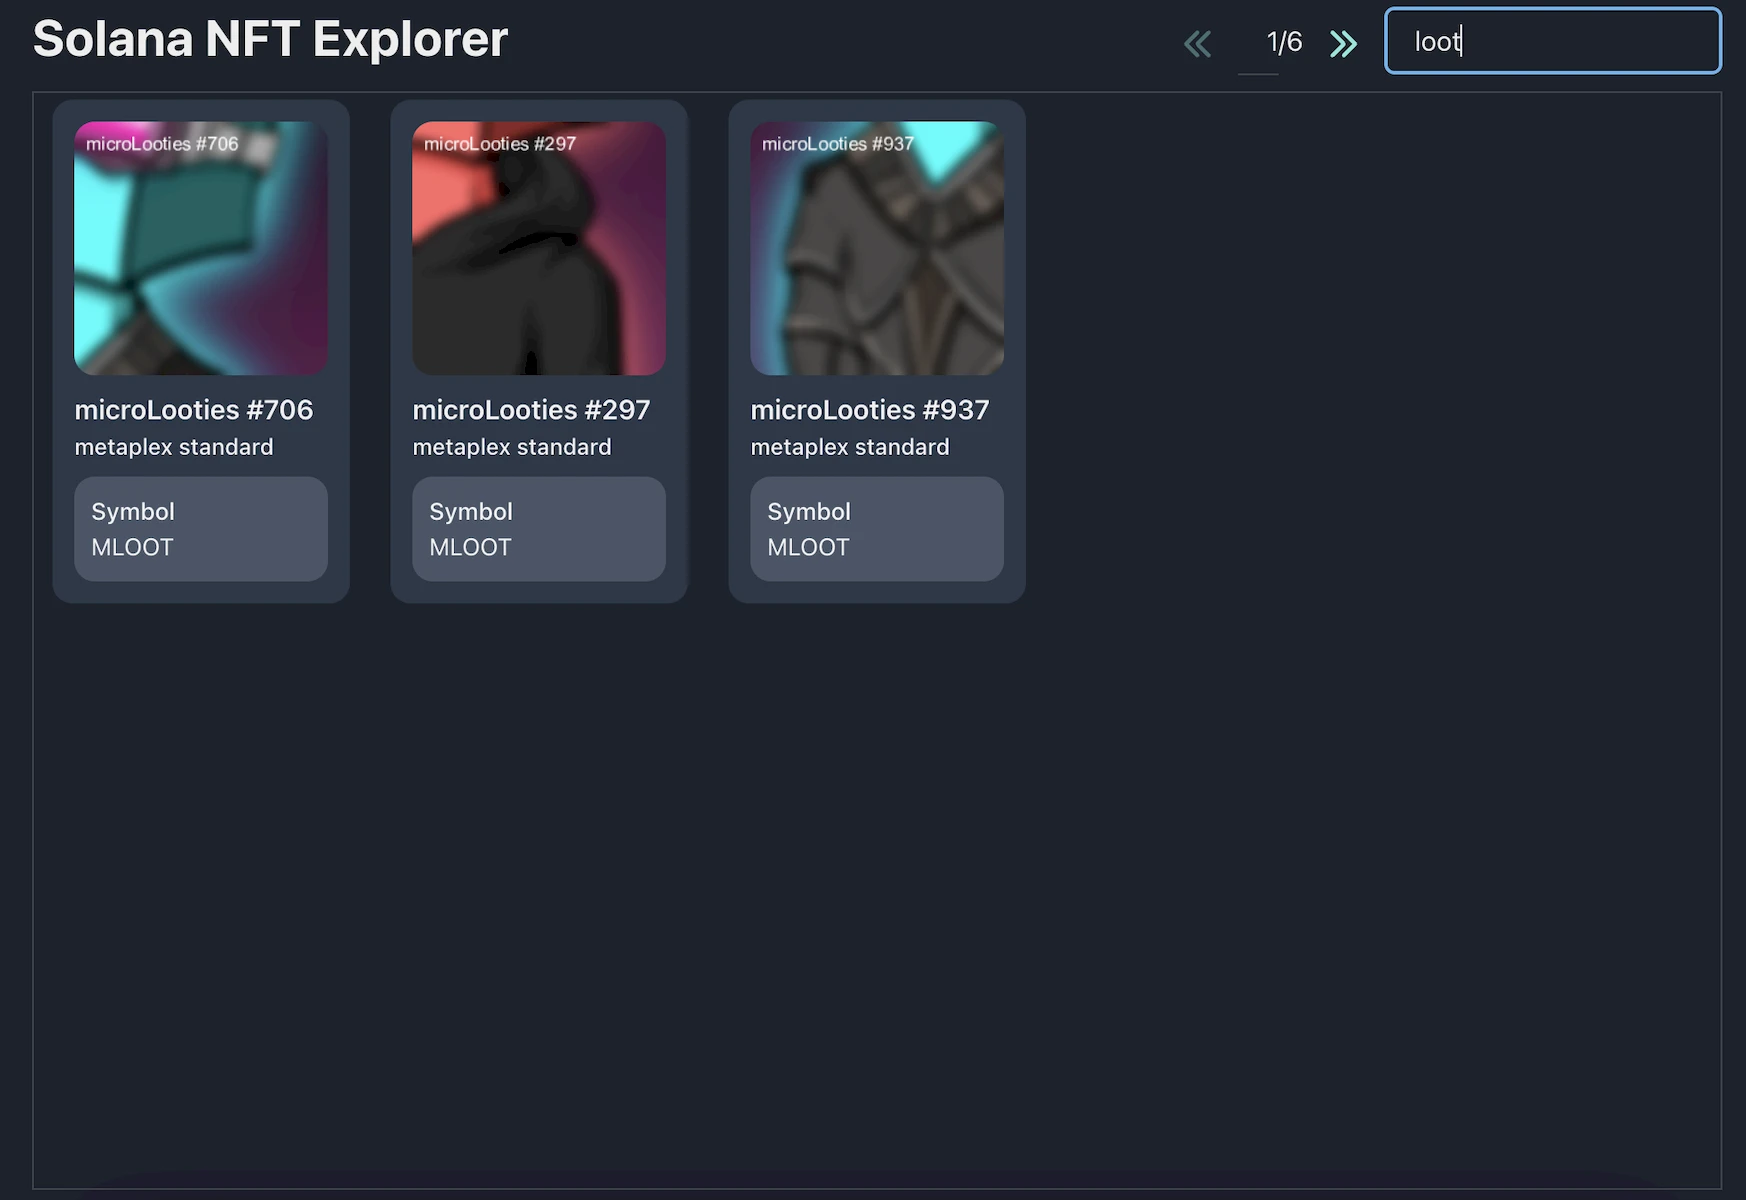
Now let's take a look at the filtering process.
NFTs can be filtered using the search button on the top right.

Here is the code responsible for filtering the NFTs in UI.
// Refer full code in `pages/index.jsx`

// State variable to store the filter query entered in the UI
const [query, setQuery] = useState('');

// 2️⃣
// `queryHandler` function updated the `query` state variable with the input data.
const queryHandler = (e) => {
  const Text = e.target.value.toLowerCase();
  setQuery(Text);
};

return (
  //...
  // 1️⃣
  // Input component to enter the filter query and it triggers
  // `queryHandler` function on input change
    <Input variant="filled" placeholder="Filter.." width={200} onInput={queryHandler} />
  //...

  //...
  // 3️⃣
  // NFTCard Component uses the query stae as on of its property.
  <NFTCard key={i} nftAddress={e.mint} filterQuery={query} />;

  //...
);
// Refer full code in `src/components/modules/NFTCard/NFTCard.jsx`

// 4️⃣
// `NFTCard` uses the `filterQuery` data when it is available
const NFTCard = ({ nftAddress, filterQuery }) => {
//...

// Stores the filter symbol state.
const [filterSymbol, setFilterSymbol] = useState();

const getNFTMetadata = async () => {
  // ...
  // 5️⃣
  // When metadata is fetched from the backend we store the NFT symbol
  // in a state variable called `filterSymbol`
 setFilterSymbol(response.symbol);
  // ...
}

 // 6️⃣
 // The value of `filterSymbol` is compared with the `filterQuery` and
 // if the value matches then the NFTCard component will be rendered,
 // else the NFTCard is not rendered in the UI.
if (filterSymbol?.toLowerCase().includes(filterQuery)) {
 return (
  //...
 );
}
  return null;
}
Here is what the filter results in the app look like.
Congratulations! 🥳
You have successfully completed the tutorial and now you know how to create your very own NFT Explorer app.
Support
If you have any trouble following the tutorial, feel free to reach out to our community engineers in our Discord or Forum to get 24/7 developer support.