Google Cloud (NodeJS) with Unity
This tutorial guide is deprecated.
This tutorial will teach you how to host your custom backend (powered by Moralis' JS SDK) on Google Cloud and then connect it to Unity.
The Steps We Will Take
- The Steps We Will Take
- Prerequisites
- Customize Code from the Quickstart NodeJS Tutorial
- Adding Authentication Methods
- Adding Authentication Operations
- Run on Google Cloud
- Calling from Unity
Prerequisites
- Complete the Quickstart NodeJS tutorial
Customize Code from the Quickstart NodeJS Tutorial
We begin this tutorial from the same point we finished the Quickstart NodeJS tutorial, but we will make some changes before advancing further.
Let’s go step by step. To start, we will install cors by executing the following command in the terminal:
npm install cors
In the top section of index.js, we will add this require:
const cors = require('cors')
We will also make the app use cors by adding this:
app.use(cors())
Now, let’s add a body parser (needed for POST requests). You can type this just below cors:
app.use(express.urlencoded({
  extended: true
}))
Finally, let’s delete the address and chain constants below MORALIS_API_KEY, as we will retrieve them somewhere else. Instead, we will add the NETWORK constant and set it to evm (for this tutorial, we will use an EVM-compatible chain):
const NETWORK = "evm";
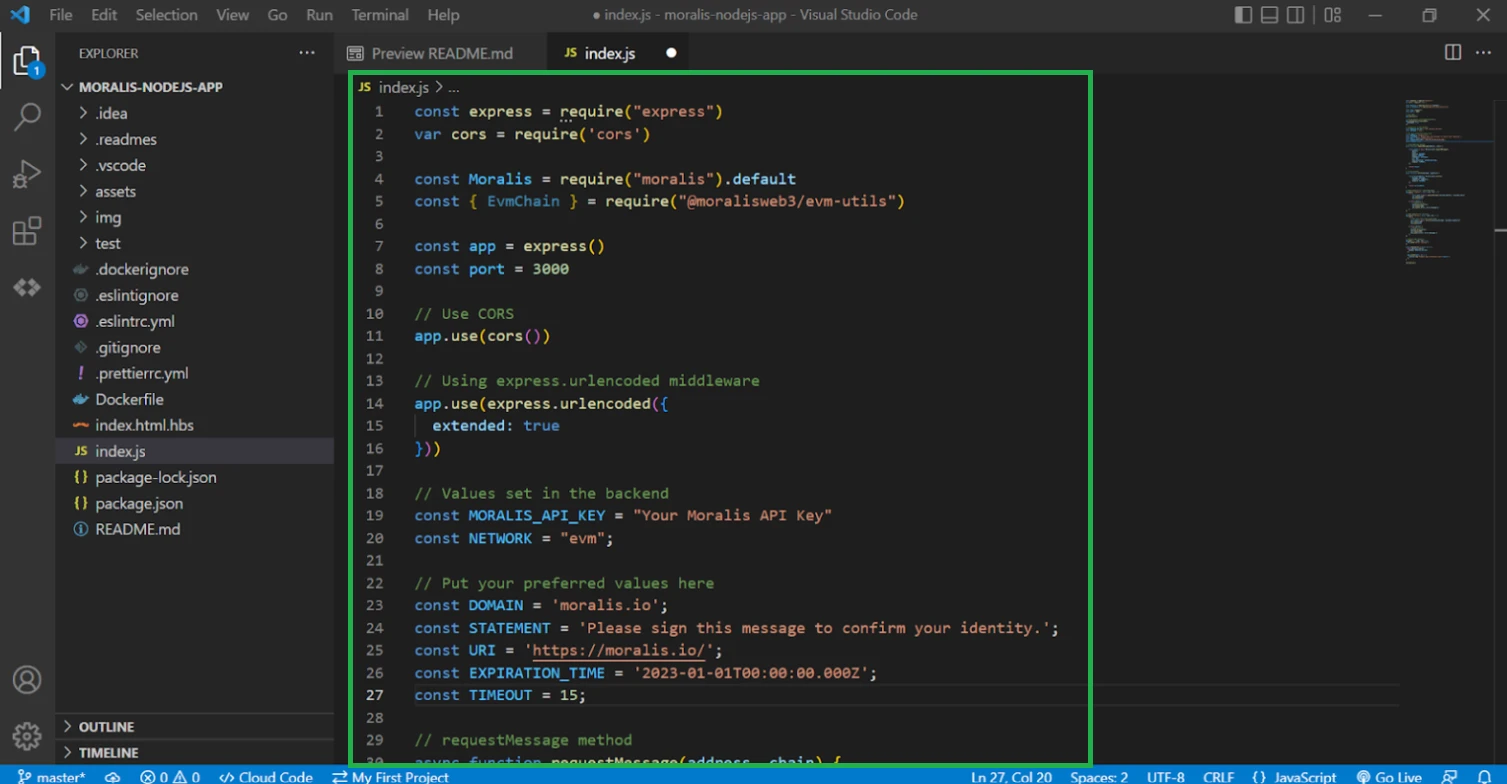
The top part of index.js should look like this:
const express = require("express")
const cors = require('cors')
const Moralis = require("moralis").default
const { EvmChain } = require("@moralisweb3/common-evm-utils")

const app = express()
const port = 3000

// Use CORS
app.use(cors())

// Using express.urlencoded middleware
app.use(express.urlencoded({
  extended: true
}))

// Values set in the backend
const MORALIS_API_KEY = "Your Moralis API Key"
const NETWORK = "evm";
Adding Authentication Methods
Since we will be using the Auth API in this tutorial, we need to create the methods that will call the request and verify endpoints.
Let’s start by adding the requestMessage() method:
async function requestMessage(address, chain) {

  const result = await Moralis.Auth.requestMessage({
    address,
    chain,
    networkType: NETWORK,
    domain: DOMAIN,
    statement: STATEMENT,
    uri: URI,
    expirationTime: EXPIRATION_TIME,
    timeout: TIMEOUT,
  })

  return result
}
As you see, Moralis.Auth.requestMessage() needs some parameters. We will pass (as parameters) address and chainId, and we already have NETWORK, but we need some more from domain to timeout. Let’s add those just above the method:
const DOMAIN = 'moralis.io';
const STATEMENT = 'Please sign this message to confirm your identity.';
const URI = 'https://moralis.io/';
const EXPIRATION_TIME = '2023-01-01T00:00:00.000Z';
const TIMEOUT = 15;
You can modify these values with the ones you want the message to have.
Finally, we can add the verify() method just below requestMessage():
async function verify(message, signature) {

    const verifiedData = Moralis.Auth.verify({
        message: message,
        signature: signature,
        network: NETWORK,
    })

    return verifiedData
}
Great! The top part of index.js should look like this:
const express = require("express")
const cors = require('cors')
const Moralis = require("moralis").default
const { EvmChain } = require("@moralisweb3/common-evm-utils")

const app = express()
const port = 3000

// Use CORS
app.use(cors())

// Using express.urlencoded middleware
app.use(express.urlencoded({
  extended: true
}))

// Values set in the backend
const MORALIS_API_KEY = "Your Moralis API Key"
const NETWORK = "evm";

// Put your preferred message values here
const DOMAIN = 'moralis.io';
const STATEMENT = 'Please sign this message to confirm your identity.';
const URI = 'https://moralis.io/';
const EXPIRATION_TIME = '2023-01-01T00:00:00.000Z';
const TIMEOUT = 15;

// requestMessage method
async function requestMessage(address, chain) {

    const result = await Moralis.Auth.requestMessage({
        address,
        chain,
        network: NETWORK,
        domain: DOMAIN,
        statement: STATEMENT,
        uri: URI,
        expirationTime: EXPIRATION_TIME,
        timeout: TIMEOUT,
    })

    return result
}

// verify method
async function verify(message, signature) {

    const verifiedData = Moralis.Auth.verify({
        message: message,
        signature: signature,
        network: NETWORK,
    })

    return verifiedData
}
Adding Authentication Operations
For the methods we just created to be accessible from another stack, such as a game engine, we need to create two operations that will call those methods.
Let’s start with the one that will call requestMessage(). You can add this below the verify() method:
app.post("/request", async (req, res) => {
    try {
        const data = await requestMessage(req.body.address, req.body.chain)
        res.status(200)
        res.json(data)

    } catch (error) {
        // Handle errors
        console.error(error)
        res.status(500)
        res.json({ error: error.message })
    }
})
As you can see, it’s a POST operation, and it expects two parameters in the request body: address and chain. They will then be used as parameters for requestMessage().
Now, let’s add the POST operation for verify():
app.post("/verify", async (req, res) => {
    try {
      const data = await verify(req.body.message, req.body.signature)
      res.status(200)
      res.json(data)

    } catch (error) {
      // Handle errors
      console.error(error)
      res.status(500)
      res.json({ error: error.message })
    }
})
These operations expect two parameters in the request body: message and signature, to be used as parameters for verify().
Later we will see what these parameters are, but for now, this is almost it.
Also, what we can do is delete getDemoData() and its GET operation (“/demo”), as we won’t be using all that information. We can replace that with a method and an operation to just get the native balance:
// getNativeBalance method
async function getNativeBalance(address, chain) {
  const nativeBalance = await Moralis.EvmApi.balance.getNativeBalance({
    address,
    chain,
  })

  const native = nativeBalance.result.balance.ether
  return native
}

// POST operation for getNativeBalance()
app.post("/nativeBalance", async (req, res) => {
  try {
    // Get and return the native balance
    const nativeBalance = await getNativeBalance(req.body.address, req.body.chain)
    res.status(200)
    res.send(nativeBalance)

  } catch (error) {
    // Handle errors
    console.error(error)
    res.status(500)
    res.json({ error: error.message })
  }
})
Finally, let’s add a simple GET operation for testing purposes:
// Default GET operation
app.get("/", (req, res) => {
  res.send("Server running!")
})
The final index.js file should look like this:
const express = require("express")
const cors = require('cors')
const Moralis = require("moralis").default
const { EvmChain } = require("@moralisweb3/common-evm-utils")

const app = express()
const port = 3000

// Use CORS
app.use(cors())

// Using express.urlencoded middleware
app.use(express.urlencoded({
  extended: true
}))

// Values set in the backend
const MORALIS_API_KEY = "Your Moralis API KEY" //FILL THIS WITH YOUR KEY!!
const NETWORK = "evm";

// Put your preferred message values here
const DOMAIN = 'moralis.io';
const STATEMENT = 'Please sign this message to confirm your identity.';
const URI = 'https://moralis.io/';
const EXPIRATION_TIME = '2023-01-01T00:00:00.000Z';
const TIMEOUT = 15;

// requestMessage method
async function requestMessage(address, chain) {

    const result = await Moralis.Auth.requestMessage({
        address,
        chain,
        network: NETWORK,
        domain: DOMAIN,
        statement: STATEMENT,
        uri: URI,
        expirationTime: EXPIRATION_TIME,
        timeout: TIMEOUT,
    })

    return result
}

// verify method
async function verify(message, signature) {

    const verifiedData = Moralis.Auth.verify({
        message: message,
        signature: signature,
        network: NETWORK,
    })

    return verifiedData
}

// POST operation for requestMessage()
app.post("/request", async (req, res) => {
    try {
        const data = await requestMessage(req.body.address, req.body.chain)
        res.status(200)
        res.json(data)

    } catch (error) {
        // Handle errors
        console.error(error)
        res.status(500)
        res.json({ error: error.message })
    }
})

// POST operation for verify()
app.post("/verify", async (req, res) => {
    try {
      const data = await verify(req.body.message, req.body.signature)
      res.status(200)
      res.json(data)

    } catch (error) {
      // Handle errors
      console.error(error)
      res.status(500)
      res.json({ error: error.message })
    }
})

// getNativeBalance method
async function getNativeBalance(address, chain) {
  const nativeBalance = await Moralis.EvmApi.balance.getNativeBalance({
    address,
    chain,
  })

  const native = nativeBalance.result.balance.ether
  return native
}

// POST operation for getNativeBalance()
app.post("/nativeBalance", async (req, res) => {
  try {
    // Get and return the native balance
    const nativeBalance = await getNativeBalance(req.body.address, req.body.chain)
    res.status(200)
    res.send(nativeBalance)

  } catch (error) {
    // Handle errors
    console.error(error)
    res.status(500)
    res.json({ error: error.message })
  }
})

// Default GET operation
app.get("/", (req, res) => {
  res.send("Server running!")
})

const startServer = async () => {
  await Moralis.start({
    apiKey: MORALIS_API_KEY,
  })

  app.listen(port, () => {
    console.log(`Example app listening on port ${port}`)
  })
}

startServer()
To run this server locally, it’s as easy as executing the npm run start command in the terminal. You can now send a GET request to http://localhost:3000/ to test if the server is responding:

Run on Google Cloud
Prerequisites
- Have or create a Google account
- Sign in to Google Cloud
Running the server locally is good for testing purposes, but in a production environment, you will probably need to run it on a cloud computing service such as Google Cloud Platform.
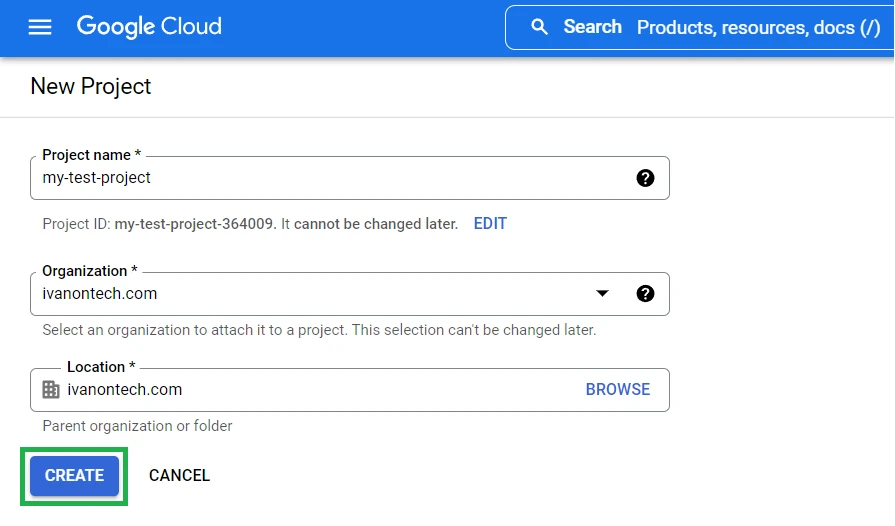
In GCP, start by creating a new project:
With the project created, you now have different options to run your server.
Deploying to Cloud Run
Using the Cloud Code Extension
In this tutorial, we’re going to use this option as we believe it’s probably the easiest method. You might want to watch the official video before starting, as we’ll be following similar steps.
To start, install the Cloud Code extension on VSC and connect to Google Cloud by clicking on Connect to Google Cloud on the blue bar at the bottom:

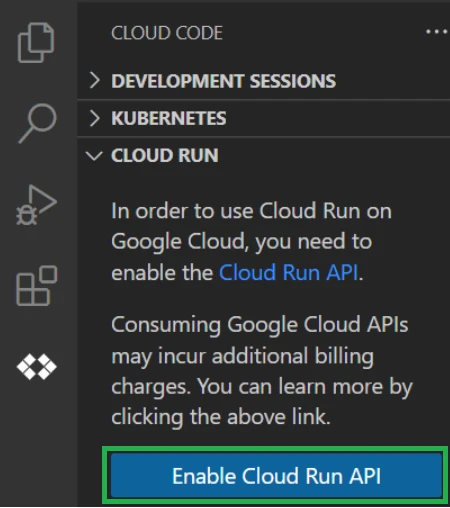
Reload VSC to make sure you’re logged in. Now, under CLOUD RUN, select your created project and click on Enable Cloud Run API:
After that, you should see something like this:

Now it’s time to create a new Cloud Run App. Click on the folder icon:

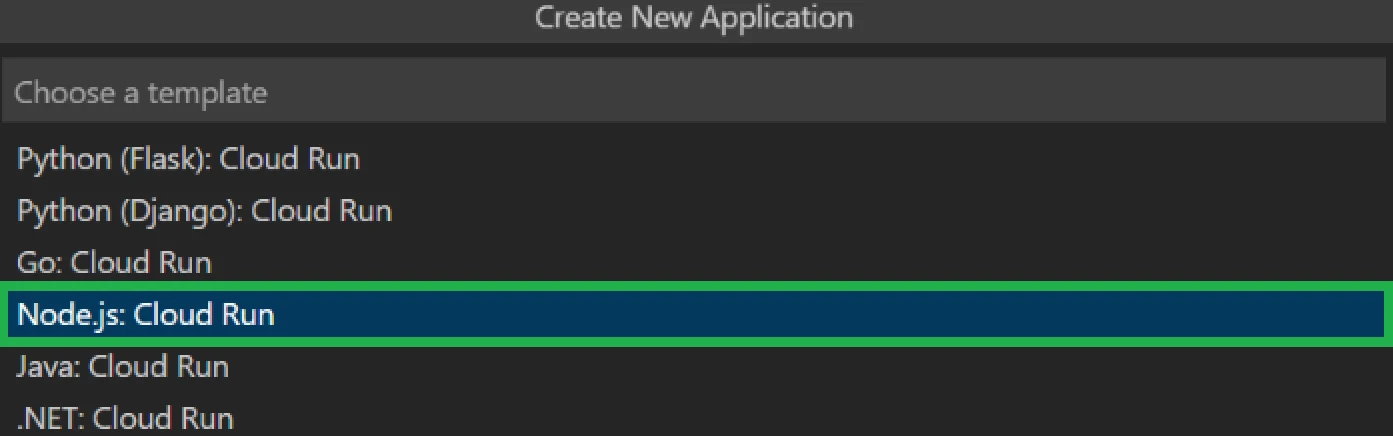
Select NodeJS: Cloud Run:
Create a new folder and name your application. We named it moralis-nodejs-app. We just created a NodeJS dapp that is ready to be deployed to Cloud Run through VSC:

So, what we need to do now is replace the code inside index.js of this newly created dapp with our customized code:
And very important, change the port to 8080 as Google Cloud requires it:
const port = 8080
Even more important is that before deploying to Cloud Run, we need to install moralis, express, and cors packages in this project. So, open up the terminal and execute:
npm install moralis express cors
Last but not least, remember to fill in your MORALIS_API_KEY, if, in any case, you cleared it up.
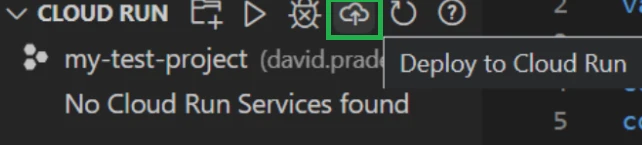
Finally, it’s time to deploy, so go to the Cloud Code extension, and under CLOUD RUN, click on the cloud icon:
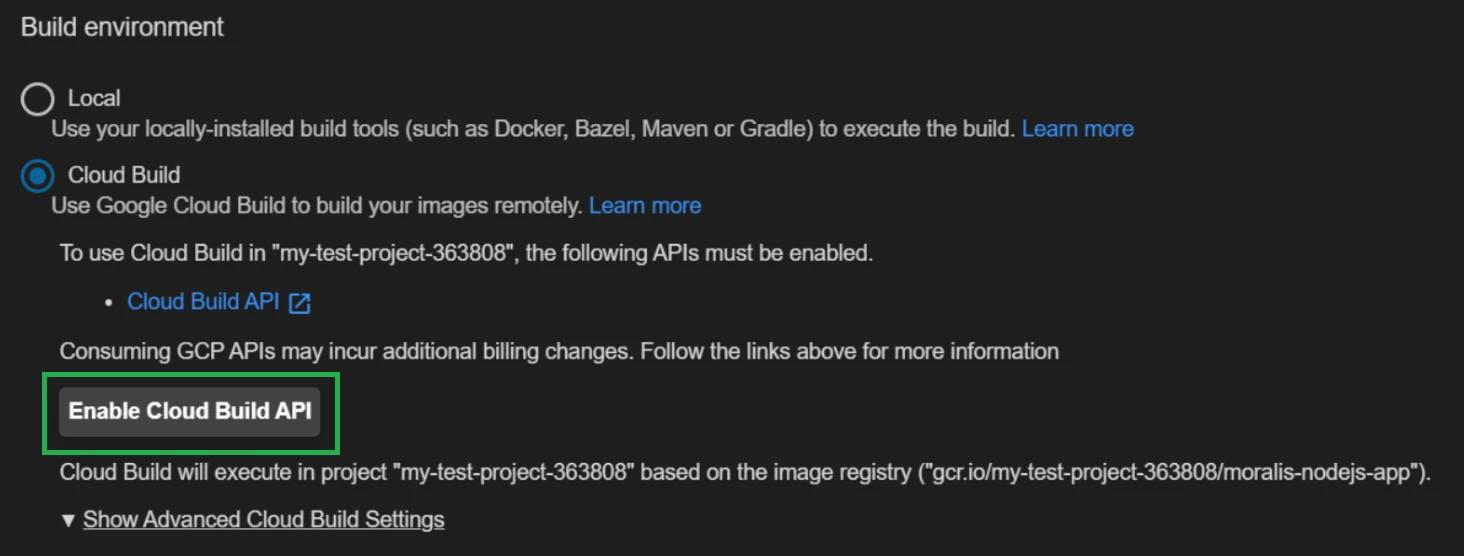
You should now see the deployment settings. Go to the Build Environment section and switch to Cloud Build. Then, click on Enable Cloud Build API:
Now, go ahead and click on Deploy:

If you have any kind of problem with Cloud Build, switch back to Local and make sure to install Docker and have it running before clicking on Deploy.
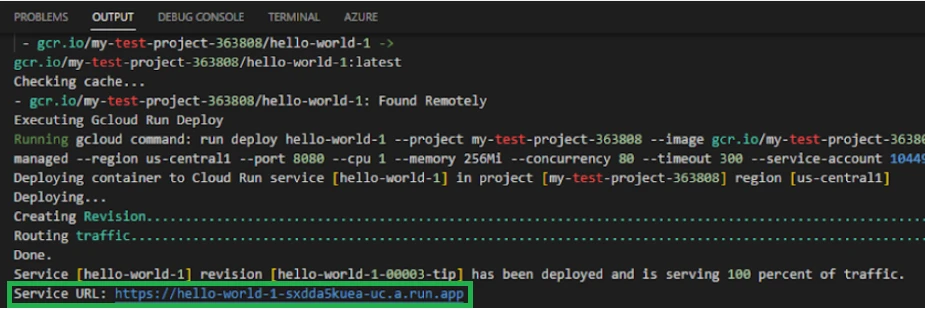
One way or another, you should have a new Google Cloud service created and running. IMPORTANT: Take note of the Service URL that shows up in the terminal:
Calling from Unity
Prerequisites
- Having Unity installed (at least a 2021.3 version)
You can start by downloading the sample project you’ll find in this repository and opening it with Unity.
Connection to Custom Backend
When you open the project, the Moralis Web3 Setup panel will appear. As we're using our own custom backend, we don't need to enter any information here, so just mark the Use Moralis 2.0 back-end integration and disable MoralisClient in Unity option and click on Done:
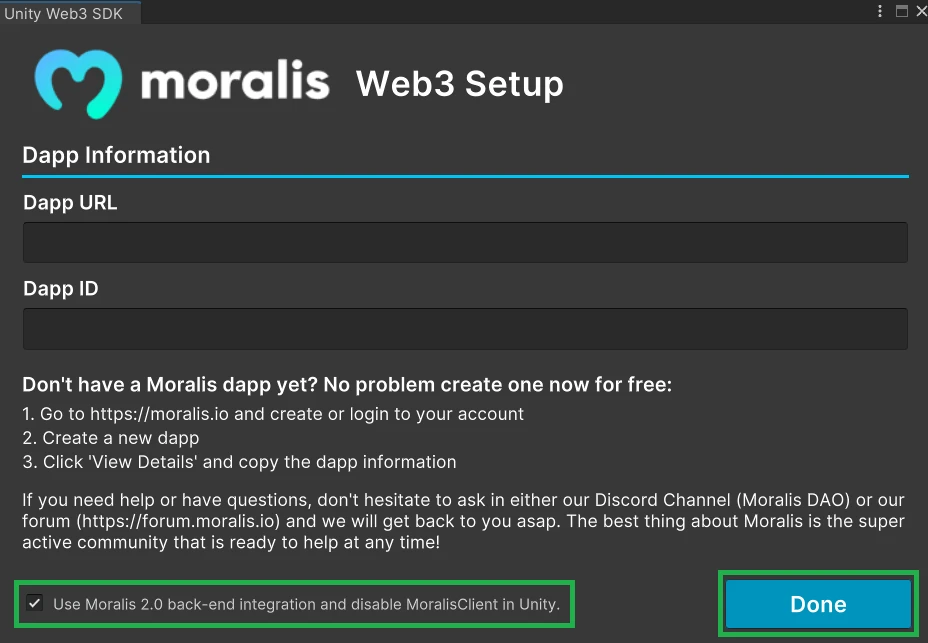
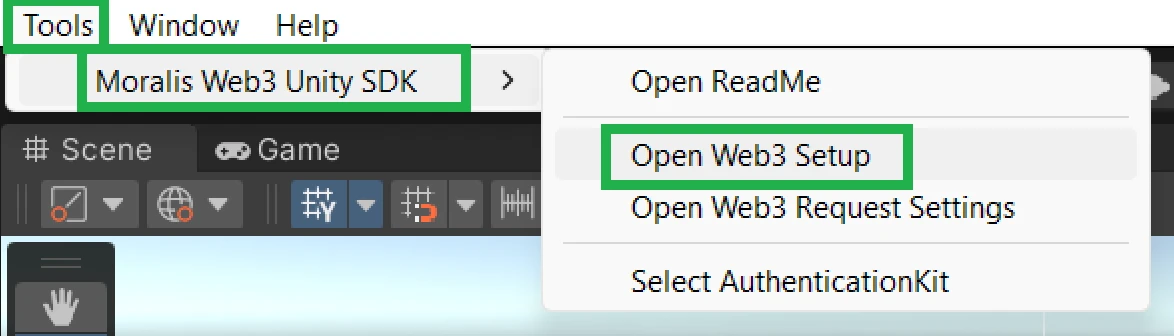
If the panel doesn't appear, you can find it on the top toolbar under Tools > Moralis Web3 Unity SDK > Open Web Setup:
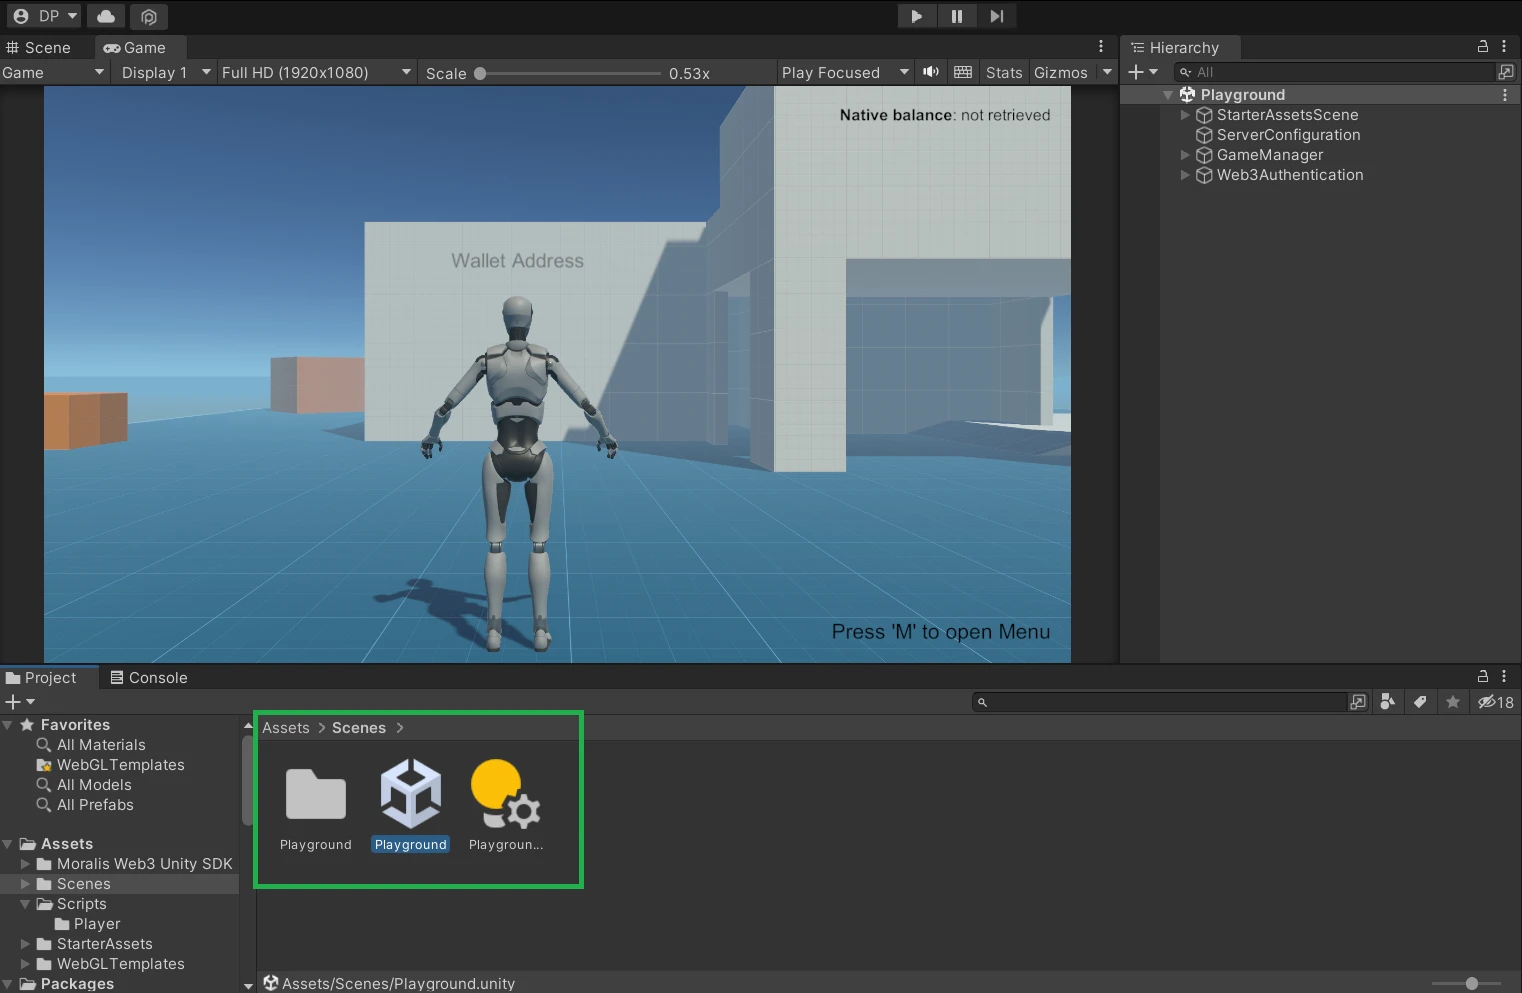
Now, go to Assets > Scenes and open the Playground scene:
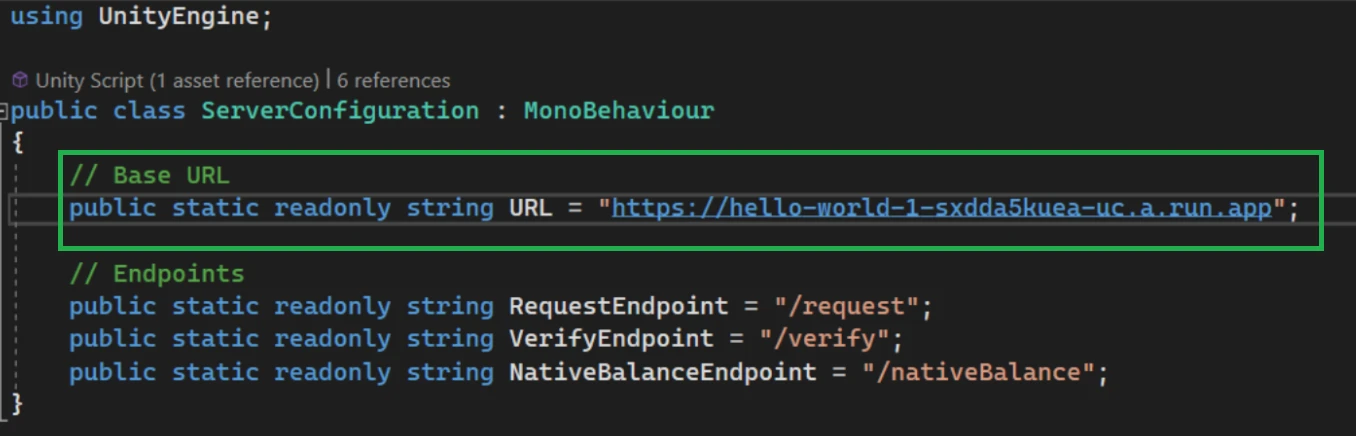
On Assets > Scripts, open ServerConfiguration.cs and paste the Google Service URL that we just obtained under URL:
With that, we are ready to play the scene, but first, let's see how we make authentication requests from Unity.
Authentication
In this sample project, we're using the available AuthenticationKit provided in the Moralis Web3 Unity SDK to manage the connection with the wallet. You'll find it in Hierarchy under Web3Authentication:
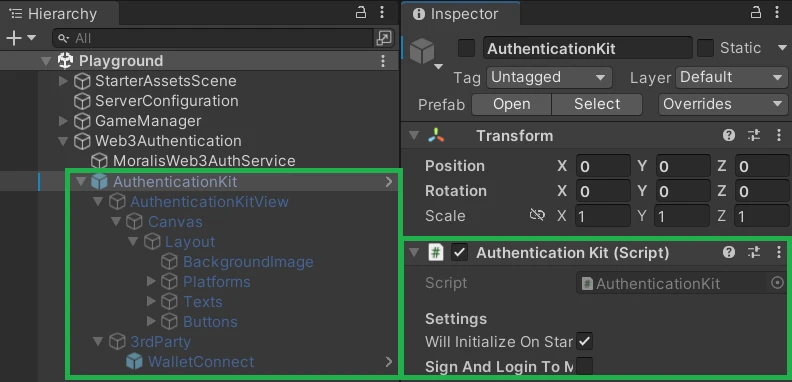
We don't need to do anything here as this project is already wired up, but we can look at the other object/script involved in the authentication process, MoralisWeb3AuthService. You'll find it just on top of AuthenticationKit:

It is the script that takes care of making requests to the request and verify operations/endpoints that we created in our custom backend using UnityWebRequests. It then manages the state of AuthenticationKit depending on the response received:
using System;
using UnityEngine;
using UnityEngine.Networking;
using System.Collections;
using UnityEngine.Events;
using WalletConnectSharp.Unity;
using Cysharp.Threading.Tasks;

using MoralisUnity.Kits.AuthenticationKit;

public class MoralisWeb3AuthService : MonoBehaviour
{
    [Serializable]
    public class RequestData
    {
        public string id;
        public string message;
        public string profileId;
    }

    private RequestData requestData;

    [Header("Events")]
    public UnityEvent OnSuccess = new UnityEvent();
    public UnityEvent OnFailed = new UnityEvent();

    // Main Components
    private AuthenticationKit authenticationKit;

    public void Awake()
    {
        authenticationKit = FindObjectOfType<AuthenticationKit>(true);
    }

    public void StateObservable_OnValueChanged(AuthenticationKitState authenticationKitState)
    {
        switch (authenticationKitState)
        {
            case AuthenticationKitState.WalletConnected:

#if !UNITY_WEBGL
                // Get the address and chainid with WalletConnect
                string address = WalletConnect.ActiveSession.Accounts[0];
                int chainId = WalletConnect.ActiveSession.ChainId;
#else
                // Get the address and chainid with Web3
                string address = Web3GL.Account().ToLower();
                int chainId = Web3GL.ChainId();
#endif
                // Create sign message
                StartCoroutine(CreateMessage(address, chainId));
                break;
        }
    }

    IEnumerator CreateMessage(string address, int chainId)
    {
        var hexChainId = $"0x{chainId:X}";

        WWWForm form = new WWWForm();
        form.AddField("address", address);
        form.AddField("chain", hexChainId);

        using (UnityWebRequest webRequest = UnityWebRequest.Post(
            ServerConfiguration.URL + ServerConfiguration.RequestEndpoint, form))
        {
            yield return webRequest.SendWebRequest();

            switch (webRequest.result)
            {
                case UnityWebRequest.Result.ConnectionError:
                    Debug.LogError("Connection Error: " + webRequest.error);
                    OnFailed?.Invoke();
                    break;

                case UnityWebRequest.Result.DataProcessingError:
                    Debug.LogError("Data Processing Error: " + webRequest.error);
                    OnFailed?.Invoke();
                    break;

                case UnityWebRequest.Result.ProtocolError:
                    Debug.LogError("Protocol Error: " + webRequest.error);
                    OnFailed?.Invoke();
                    break;

                case UnityWebRequest.Result.Success:
                    requestData = JsonUtility.FromJson<RequestData>(webRequest.downloadHandler.text);
                    Debug.Log(requestData.message);

                    SignMessage(requestData.message);
                    break;
            }
        }
    }

    private async void SignMessage(string message)
    {
        authenticationKit.State = AuthenticationKitState.WalletSigning;

#if !UNITY_WEBGL
        // Sign the message with WalletConnect
        string address = WalletConnect.ActiveSession.Accounts[0];
        string signature = await WalletConnect.ActiveSession.EthPersonalSign(address, message);
#else
        // Sign the message with Web3
        string signature = await Web3GL.Sign(message);
#endif
        if (!String.IsNullOrEmpty(signature))
        {
            StartCoroutine(Authenticate(message, signature));
        }
        else
        {
            // If there is no signature fire the OnFailed event
            OnFailed.Invoke();
        }
    }

    IEnumerator Authenticate(string message, string signature)
    {
        WWWForm form = new WWWForm();
        form.AddField("message", message);
        form.AddField("signature", signature);

        using (UnityWebRequest webRequest = UnityWebRequest.Post(
            ServerConfiguration.URL + ServerConfiguration.VerifyEndpoint, form))
        {
            yield return webRequest.SendWebRequest();

            switch (webRequest.result)
            {
                case UnityWebRequest.Result.ConnectionError:
                    Debug.LogError("Connection Error: " + webRequest.error);
                    OnFailed?.Invoke();
                    break;

                case UnityWebRequest.Result.DataProcessingError:
                    Debug.LogError("Data Processing Error: " + webRequest.error);
                    OnFailed?.Invoke();
                    break;

                case UnityWebRequest.Result.ProtocolError:
                    Debug.LogError("Protocol Error: " + webRequest.error);
                    OnFailed?.Invoke();
                    break;

                case UnityWebRequest.Result.Success:

                    // If the authentication succeeded the user profile is update and we get the UpdateUserDataAsync return values a response
                    // If it failed it returns empty
                    if (!String.IsNullOrEmpty(webRequest.downloadHandler.text))
                    {
                        authenticationKit.State = AuthenticationKitState.WalletSigned;

                        // On success fire the OnSuccess event
                        OnSuccess.Invoke();
                        Debug.Log(webRequest.downloadHandler.text);
                    }
                    else
                    {
                        // If the response is empty fire the OnFailed event
                        OnFailed.Invoke();
                    }

                    break;
            }
        }
    }
}
Using this setup, we get the wallet information in the client (Unity), and we send it to our custom backend to manage the verification.
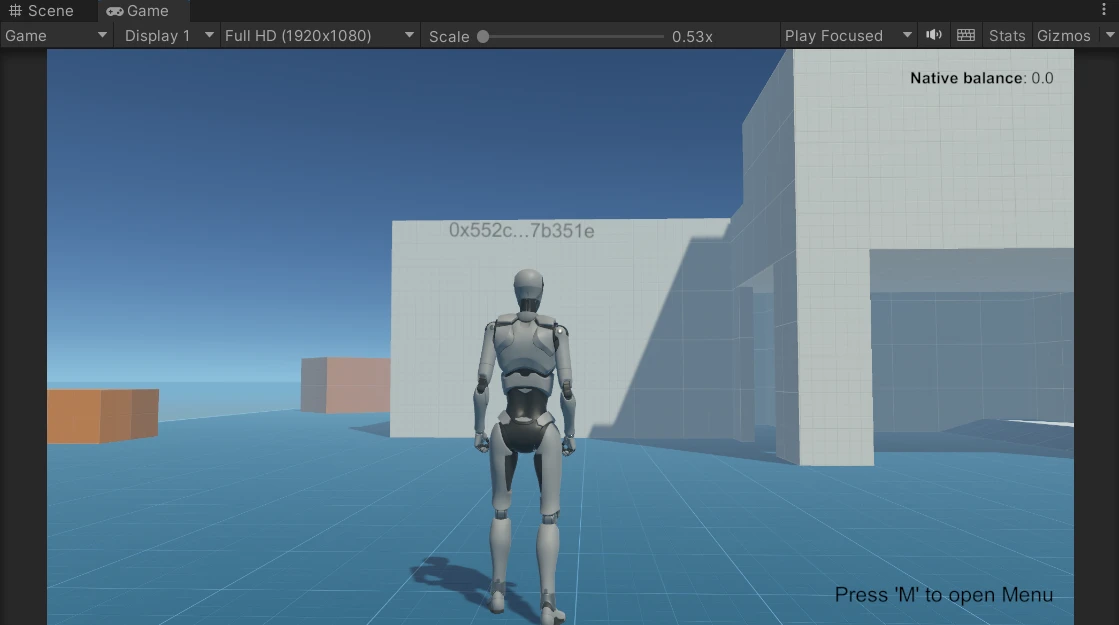
Let's try to see if our setup works. Play the scene, press M, and click on Connect. Then, scan the QR code with your preferred wallet:
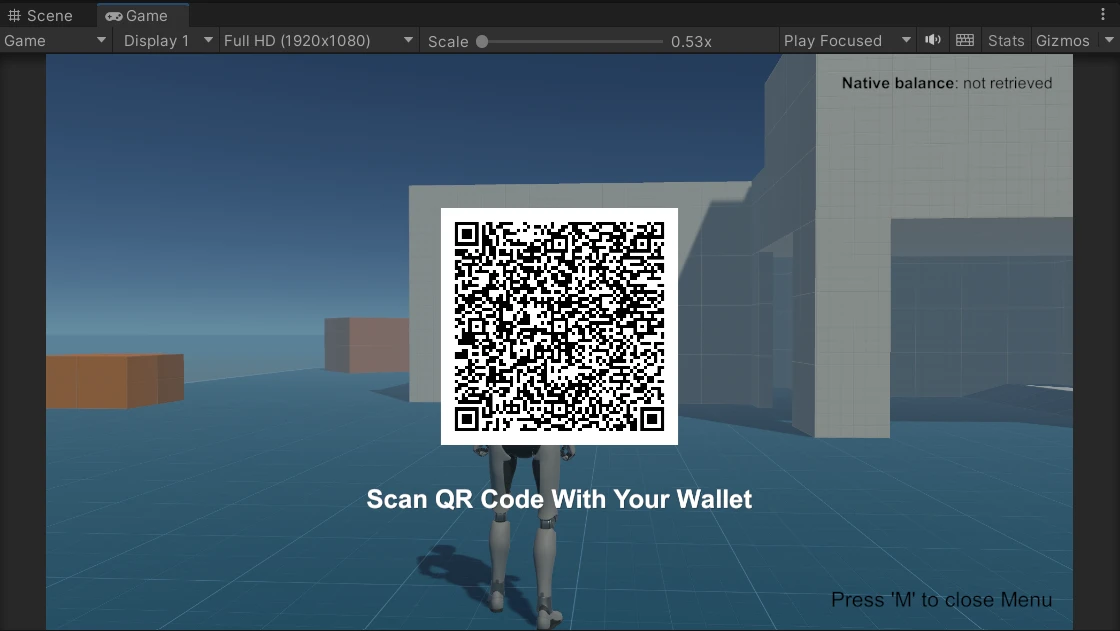
After connecting and signing the message, you should be authenticated, seeing your wallet address on top of the character, and the text on the top right of the screen should be updated with your native balance: