Solana Micro Blogger Dapp
Introduction
This tutorial teaches you how to create your very own Micro Blogger Dapp powered by Solana Smart contract and Moralis Auth API.
Once complete, you can use this dapp to create blog posts on Solana Blockchain.
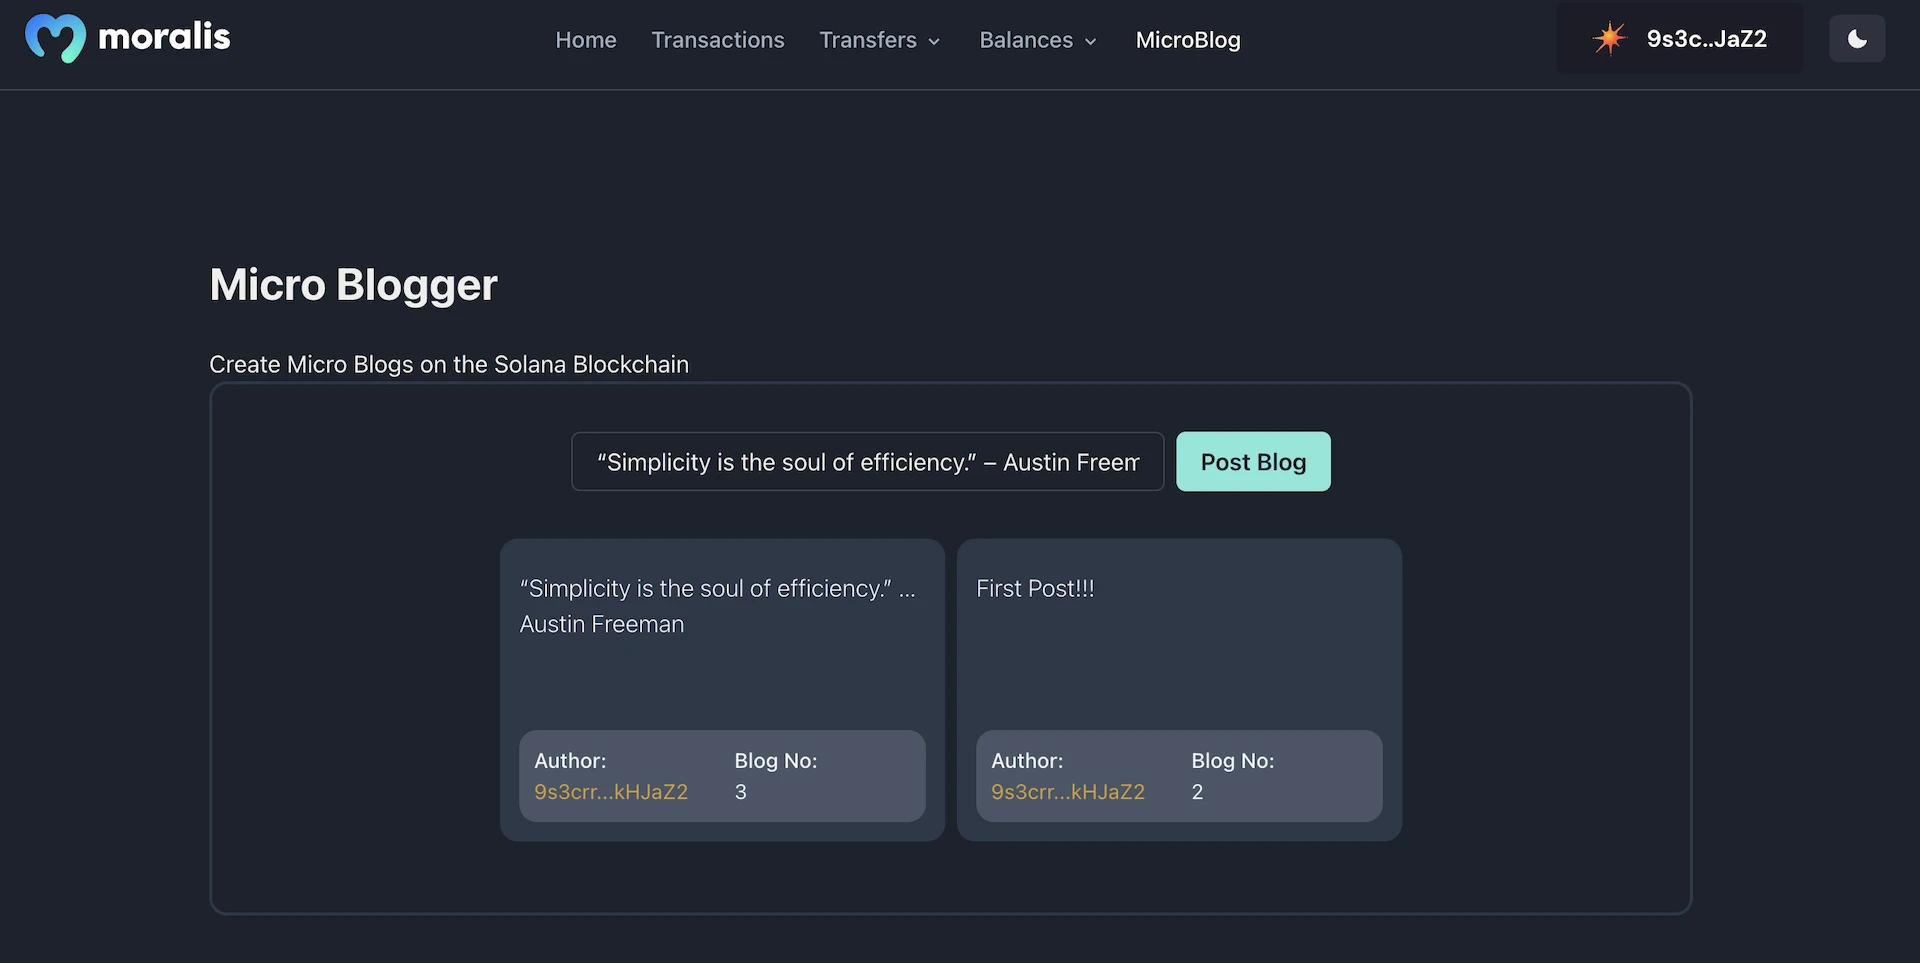
This is what the final application looks like. You can enter the text in the input and click on the "Post Blog" button to process the transaction.
You can find the repository with the final code here: Solana-Micro-Blogger.
Step1: Deploy Contract
Start a new rust library project named micro_blog
cargo init micro_blog --lib

cd micro_blog
Update Cargo.toml file with required rust library configurations
[lib]
name = "micro_blog"
crate-type = ["cdylib", "lib"]
Install the solana_program and borsh package using
cargo add solana_program
cargo add borsh
This is the code for the Micro Blogger solana program. With this code, we will keep track of the number of blogs a wallet has posted and we will log the Blog content and counter to the transaction logs to access it from the client side. Paste this code in lib.rs file.
use borsh::{BorshDeserialize, BorshSerialize};
use std::str;

use solana_program::{
    account_info::AccountInfo, entrypoint, entrypoint::ProgramResult, msg,
    program_error::ProgramError, pubkey::Pubkey,
};

// Create a struct to store Blog count
#[derive(BorshSerialize, BorshDeserialize, Debug)]
pub struct BlogCount {
    pub total_blogs: u32,
}

// Function to convert buffer array back to string
pub fn buffer_to_string(buffer: &[u8]) -> &str {
    let s = match str::from_utf8(buffer) {
        Ok(v) => v,
        Err(e) => panic!("Invalid UTF-8 sequence: {}", e),
    };
    return s;
}

entrypoint!(micro_blog);

pub fn micro_blog(
    program_id: &Pubkey,
    accounts: &[AccountInfo],
    instruction_data: &[u8],
) -> ProgramResult {
    let data = buffer_to_string(&instruction_data);

    let account = &accounts[0];

    // Check if the account is owned by this program, else throw an error.
    if account.owner != program_id {
        msg!(
            "Account {:?} does not have the program id {} as owner",
            account,
            program_id
        );
        return Err(ProgramError::IncorrectProgramId);
    }

    // Increment and store the number of times user created a new blog.
    let mut blog_counter = BlogCount::try_from_slice(&account.data.borrow())?;
    blog_counter.total_blogs += 1;
    blog_counter.serialize(&mut &mut account.data.borrow_mut()[..])?;

    // Save the data to the transaction logs
    msg!("Author: {}", accounts[1].key);
    msg!("Blog No: {}", blog_counter.total_blogs);
    msg!("Blog: {}", data);

    Ok(())
}
Build the Solana Rust Program using
cargo build-bpf
Once built successfully without any error .so of the program will be added to the /target/deploy folder. You can deploy this to the solana cluster using.
solana program deploy ./target/deploy/micro_blog.so
Once successfully deployed it will return the program Id of the Solana Program.

Store the Program Id somewhere accessible, as we will need this to call the smart contract function from the client side.
Step2: Frontend Setup
Follow these steps to run the project in your local environment.
- Clone the project from GitHub using the
git clonecommand andcdinto the project
git clone https://github.com/JohnVersus/solana-dapp-micro-blog.git

cd solana-dapp-micro-blog
- Install the dependencies using the
yarnornpmpackage manager.
yarn install
- Rename
.env.local.examplefile to.env.localand add the required environment secrets.
APP_CHAIN_ID=devnet
APP_DOMAIN=ethereum.boilerplate
MORALIS_API_KEY= xxx
NEXTAUTH_SECRET= # Linux: `openssl rand -hex 32` or go to https://generate-secret.now.sh/64
NEXTAUTH_URL=http://localhost:3000
- Start the app in localhost port 3000.
yarn run dev
Once the command has been run successfully, you should be able to view the app in localhost port 3000, or click here to open the page directly.
In the app, you'll find multiple tabs, but for this tutorial, we only need to access the /microBlog page to create new blog posts.

To use the app, we must first connect to the Solana wallet. This can be done by clicking the "Select Wallet" button on the top right. You can then connect to the wallet of your choice.

The code related to authentication can be found in the src/components/modules/ConnectButton folder, although we won't be looking at the authentication code in this tutorial.
If you want to know how authentication works, you can take a look at this video.
Step3: Calling the Smart Contract
The first step of the app is to add the program Id of the solana contract and initiate a devnet cluster connection, where we will test the app.
Only partical code is shown here to keep it clean. Visit
src/components/templates/microBlogto view the entire code.
const programId = 'xxx';
const connection = new Connection(clusterApiUrl('devnet'));
The next part of the code is used to create a new PDA account unique for the user that stores the blog counter data on the chain and the same code will also initiate a transaction to create a new blog post.
// Refer full code in `src/components/templates/microBlog/MicroBlog.tsx`

// `createBlog` function is triggered with a button click from frontend.
  const createBlog = async () => {
    // Account Creation --- Start
    const SEED = 'secret_phrase_to_recover_account_address';
    class BlogCount {
      total_blogs = 0;
      constructor(fields: { total_blogs: number } | undefined = undefined) {
        if (fields) {
          this.total_blogs = fields.total_blogs;
        }
      }
    }
    const BlogSchema = new Map([
      [
        BlogCount,
        {
          kind: 'struct',
          fields: [['total_blogs', 'u32']],
        },
      ],
    ]);
    const DATA_SIZE = borsh.serialize(BlogSchema, new BlogCount()).length;
    const accountPubkey = await PublicKey.createWithSeed(publicKey, SEED, new PublicKey(programId));
    const blogAccount = await connection.getAccountInfo(accountPubkey);

    if (blogAccount === null) {
      const lamports = await connection.getMinimumBalanceForRentExemption(DATA_SIZE);
      // Transaction for account creation
      const AccountCreation = new Transaction();
      AccountCreation.add(
        SystemProgram.createAccountWithSeed({
          fromPubkey: publicKey,
          basePubkey: publicKey,
          seed: SEED,
          newAccountPubkey: accountPubkey,
          lamports,
          space: DATA_SIZE,
          programId: new PublicKey(programId),
        }),
      );
      const {
        context: { slot: minContextSlot },
        value: { blockhash, lastValidBlockHeight },
      } = await connection.getLatestBlockhashAndContext();

      const signature = await sendTransaction(AccountCreation, connection, {
        minContextSlot,
        skipPreflight: true,
        signers: [],
        preflightCommitment: 'processed',
      });
      const confirmtx = await connection.confirmTransaction({ blockhash, lastValidBlockHeight, signature });
    }
    // Account Creation --- END

    // Transaction to post a new blog
    const transaction = new Transaction();
    setStatus('Processing Transaction');
    transaction.add(
      new TransactionInstruction({
        keys: [
          {
            pubkey: accountPubkey,
            isSigner: false,
            isWritable: true,
          },
          {
            pubkey: publicKey,
            isSigner: true,
            isWritable: false,
          },
          {
            pubkey: SystemProgram.programId,
            isSigner: false,
            isWritable: false,
          },
        ],
        programId: new PublicKey(programId),
        data: Buffer.from(blogInupt),
      }),
    );

    const {
      context: { slot: minContextSlot },
      value: { blockhash, lastValidBlockHeight },
    } = await connection.getLatestBlockhashAndContext();

    try {
      const signature = await sendTransaction(transaction, connection, {
        minContextSlot,
        skipPreflight: true,
        signers: [],
        preflightCommitment: 'processed',
      });

      const confirmtx = await connection.confirmTransaction({ blockhash, lastValidBlockHeight, signature });
      await connection.getParsedTransaction(signature);
      getAllTransactions();
    } catch (e) {
      console.log(e);
    }
  };

// `getAllTransactions` function is invoked after a new blog is created,
// and the new data processed and updated in the UI
  const getAllTransactions = async () => {
    const data = await connection.getSignaturesForAddress(new PublicKey(programId));
=  };
And there we have it! That's all the code required to create a transaction to call the solana contract and to post the data on the chain.
Step4: Testing
The dapp can be tested by visiting the /microBlog page. Add the text that you want to store on the blockchain and click on the "Post Blog" button.

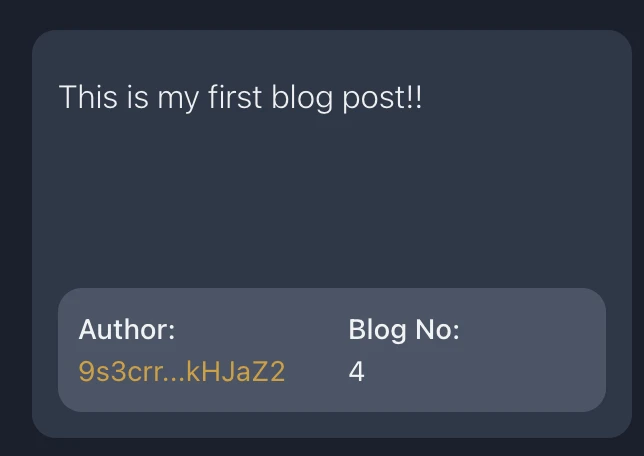
When posting the first blog you will have to sign two transactions. One for creating the account and the other for creating the blog post. Once the transactions are successful. You should see the blog updated in the UI, with the Blog number.
Congratulations! 🥳
Now you know how to create your very own Solana Micro Blogger dapp to create blog posts in the blockchain.
Support
If you have any trouble following the tutorial, feel free to reach out to our community engineers in our Discord or Forum to get 24/7 developer support.